This article will attempt to cover all aspects of DIY CO2 systems used on freshwater-planted aquaria. Insights into the needs of aquatic plants in relation to CO2, and how this relates to CO2 injection methods, will be described. It will examine mechanical designs, and the biology of yeast relating to its ability and conditions by which it produces carbon dioxide. Formulas for yeast mixtures and some details on construction projects will also be provided.
Plants and CO2
Carbon is the fundamental element that all life on this planet is based. Plants are no exception. Since plants have no way of getting to their food sources, nutrients have to be obtained from their surrounding environment. Plants use many macro and micronutrients, carbon dioxide (CO2) being one of the primary macronutrients. In an aquarium the limiting factors are most likely to be (in order): light, CO2, micronutrients (trace elements), and macronutrients. Micro and macronutrients are usually supplied in adequate quantities by fish waste and the addition of fertilizers.
Plants use a process known as photosynthesis to produce the carbohydrates they need for life. Photosynthesis requires light for energy and CO2 to drive the chemical reactions. The process of photosynthesis requires a specific light energy threshold. In other words, there is a point where light has reached a specific intensity to start photosynthesis. If the light is not bright enough, photosynthesis will not occur. Beyond that threshold and up to some high light level, photosynthesis will run faster and faster. According to known practice, when light levels exceed two watts per gallon, supplementary CO2 is required for most aquariums.
In our planted aquariums, CO2 is present without it being added my mechanical means. Fish respire CO2 from their gills. Also in an aerated tank, CO2 from the atmosphere is dissolved in the water. This effect is known as atmospheric equilibrium. In nature though, CO2 levels are usually higher than can be explained by animal respiration or atmospheric equilibrium, and aquatic plants have evolved to this higher concentration of dissolved CO2 in water. Carbon dioxide rich groundwater often feeds the streams and natural CO2 concentrations up to several hundred times atmospheric equilibrium are common. In general, aquatic plants like to see approximately a concentration of 10-15ppm of dissolved CO2 in their environment. CO2 levels from atmospheric equilibrium are generally around 2-3ppm. (ppm stands for part per million). As you can see, CO2 injection is essential for vigorous plant growth, and even more so with higher light levels.
 As far a fish are concerned, high concentrations, CO2 can block the respiration of CO2 from the fish gills and cause oxygen starvation. Since the gills depend on a CO2 concentration differential between the levels in the blood and the water to transfer gases, high levels in the water will reduce the amount of CO2 that can be transferred. Although different references have wildly varying values for toxic levels, a concentration of below 30ppm is definitely safe.
It is a common misconception that water can hold only so much dissolved gas and adding CO2 will displace oxygen. This is not true. As a matter of fact, if enough CO2 and light is present to enable vigorous photosynthesis, oxygen levels can reach 120% of saturation. Even at night, when the plants stop using CO2 and start using oxygen, the oxygen levels will stay about the same as a typical non-planted aquarium. So reports of people having fish at the surface gasping for air is not necessarily a result of high CO2 levels, but instead a lack of oxygen in the water is probably the culprit.
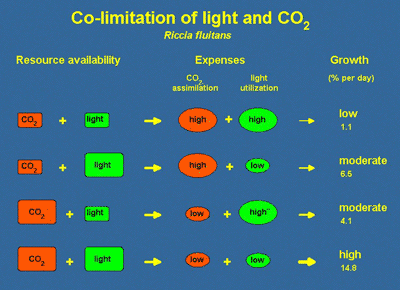
The relationship between light and CO2 levels is important. The diagram at the right explains it conceptually. At low light and low CO2 there is not much energy to play around with for up or down-regulation of the pools of Chlorophyll or enzymes contained in the plant. If we then add a little more CO2 to the system the plant can afford to invest less energy and resources in CO2 uptake and that leaves more energy for optimizing the light utilization - Chlorophyll can be produced without fatal consequences for the energy. Hence, although we have not raised the light, the plant can now utilize the available light more efficiently. Exactly the same explanation can be used to explain why increased light can stimulate growth even at very low CO2.
concentrations. With more light available, less investment in the light utilization system is necessary and the free energy can be invested into a more efficient CO2 uptake system so that the CO2, which is present in the water, can be more efficiently extracted. Providing macro and micronutrients to plants is easily done with commercially available fertilizers. It is often a more difficult and expensive task to provide adequate light over the plant aquarium. Both numerous fluorescent light and halide lamps will produce sufficient light if supplied with effective reflectors, but in deep aquaria (more than 20 inches) is very difficult to offer enough light to small light demanding foreground plants. Based on known experiments, I suggest commencing CO2 addition before any other action is taken! I believe that even at very modest light intensities you will experience a conspicuous change in plant performance in your aquarium. The exact amount CO2 may always be discussed but concentrations from 10-15ppm will only improve plant growth. You will probably see that plants, which were barely able to survive before now thrive in the presence of CO2. These conclusions were derived from work conducted by Ole Pedersen, Claus Christensen, and Troels Andersen.
Basics of DIY CO2 Systems
Injection of CO2 into a planted aquarium can be accomplished in several ways. There are commercial products available like the tablets available form Bioplast and other manufacturers that use tablets that fizz like Alka-Seltzer, and metabolite products like Seachem Excel. While these provide carbon sources for plants, they do not provide a continuous injection of CO2 into the aquarium. Another method is a pressurized CO2 system. This is comprised of a tank of compressed CO2 gas, a regulator, and needle valve. While this is probably the best method available, it can be cost prohibitive. A nice compromise is the DIY system. The first step is creating a CO2 generator, a renewable source of carbon dioxide. There many ways to generate carbon dioxide gas, but the simplest and safest method is a yeast generator. Yeast consumes sugar and one of the byproducts of this is CO2. How yeast does this depends upon the environment the yeast and sugar is placed in. The most common method is to place yeast and sugar in a solution with water. This process is known as fermentation.
Next, you have to be able to collect the CO2 and deliver it to the water in the tank. The yeast/sugar solution is placed in an airtight container, which has a fitting that allows a tube to be connected. This tube is then run to meet the water in some way.
At this point some efficient manner is needed to inject and dissolve the CO2 gas into the water. This can be done by directly bubbling the CO2 gas into the water, passive contact, diffusion, or forced reaction. These methods will be discussed in more detail later.
These are the essential elements of a DIY CO2 system: A CO2 generator, tubing, and a water injection system.
Some examples of system designs
While one can design a system that is very complex, this might defeat the cost effectiveness that warrants a DIY approach. Most of the designs offered here are done so as examples, and are designed with cost savings in mind, while at the same time offering a high degree of good engineering practice and efficient performance. Since yeast generators supply a limited and varied quantity of CO2 gas, it is imperative that the designs used are efficient in their ability to deliver and dissolve whatever CO2 is available over time.
Basic schematic representation of a well-designed DIY CO2 system is shown below.

Yeast Generator
Probably the cheapest and still the best vessel you can use for a yeast generator is the two-liter soda bottle. If you can find one of those four-liter versions, that is even better. There are several factors that make the soda bottle a good choice. First off, it is designed to hold a solution of water with dissolved CO2 under pressure. This is important. The pressure that builds up in a yeast generator can be substantial. I would venture to say it is not lethal, but it certainly can make quite a mess if it fails and sprays sugar water and yeast all over your house.
The cap and how to attach the tubing is another issue that has created much discussion. Most of these caps from soda bottles are made from polyethylene. Polyethylene does not readily bond with most glue. So gluing the tubing in place is not desirable. Leaks will occur, especially at the bond joint. Furthermore, since we're dealing with gasses, the seal must be airtight. The best all around solution is some mechanical means to attach tubing. Some type of bulkhead fitting is needed.
Gas Delivery (tubing)
Getting the gas to the tank water is the next consideration. Tubing should be selected based upon several factors. One is pressure retention, or the ability of tubing to retain its shape under pressure. As tubing is put under pressure, it should not expand in relation to its diameter. Also the tubing will need to be inert; meaning not break down over time due to chemical reaction with the CO2 gas internally or the air or water externally. This pretty much eliminates standard airline tubing used for fish tank aeration. Another consideration is flexibility.
A good candidate for this application is silicon tubing. It does not react with CO2 as quickly, has good pressure retention characteristics and is very flexible. There is also special tubing designed specifically for carrying CO2 gas, and I would encourage spending the few extra dollars needed to use this. But silicon tubing will last for several years, and is in keeping with the cost savings approach DIY implies.
It is also important that water is not allowed to run back down the line by suction or siphoning. This problem is easily remedied with the use of a check valve. Many check valves are available commercially. Several factors should be considered when selecting one. I would avoid choosing one made from metals. The caustic nature of CO2 gas, the high water vapor content of the gas (which usually contain carbonic acid), will cause a metal check valve to fail. Therefore it is important to choose a plastic valve or one designed specifically for CO2 applications. In addition, for the same reasons, I recommend avoiding the use of any metal components in the entire system. In pressurized tank systems, there is generally no liquids, or solids for that matter, to foul or corrode metal components. So the use of metal components is common in these systems. The same should not be assumed on a yeast based DIY system.
Getting the gas dissolved in the water
This is a topic that has received much attention on message boards, mailing list servers, and newsgroups over the years. And I think rightfully so! Many methods have been described on what the best way to dissolve the CO2 gas into the tank water. This is the critical point in determining the effectiveness of a DIY system and the reason why many feel that their experience with DIY systems was a bad one. Since the amount of CO2 available in a yeast system is limited by biological production, it is important to get most, if not all, the CO2 produced dissolved into the water. Skimp here, and you have wasted your time, not to mention CO2 gas.
The simplest, and least effective, method is to run the tube into the tank and simply let the gas bubble into the tank, or through an air stone. I do not recommend this method at all. Since most of the CO2 gas simply rises to the surface and is lost.
Next, many have suggested placing this tube at the inlet of a canister filter and allowing the impeller to munch up the gas. While it is effective in dissolving the gas, I do not like this method either, for two reasons. First, the CO2 bubbles can produce cavitations of the impellor, which could cause it to vibrate, making noise and possibly damage the mechanism. Second, some of the components in the impellor use rubber fittings, which could be broken down over time by the high concentrations of CO2 gas and carbonic acids present.

A better but slower method is the use of what is called a CO2 bell. Simply put, this is a hemispherical shaped vessel of some kind, inverted and the CO2 is allowed to fill up inside. The contact area of the gas is increased and passive diffusion of the gas is increased. The drawback of this is if the surface area is not high enough, so that diffusion rate exceeds gas production, the bell will fill with gas and any additional bubbles will run out the side and travel up to the surface and be lost. While this is a draw back, many aqaurists have have had reasonable sucess using this method of gas diffusion. These are also very simple to construct. Many have been constructed from cutting off the tops of one-liter soda bottles, petri dishes, cups, or any hemisphercal shaped object. I would recommend using a material or object that is transparent, to allow for easy viewing.

Two versions of diffusers exist. One is device that increases the time the bubble is in contact with the water. Usually by presenting the bubble with a long spiral course it has to travel. In the image to the right is one example of this type of spiral diffusion method, the Econo Aqualine 500 available from AquaBotanic, and others. The manufacturer claims, "The special construction allows a very high CO2 diffusion rate and automatically removes any false gasses. The reactor is sufficient for an aquarium up to 125 Gallons". This unit is mounted on the inside of the aquarium.
Another diffuser type is a glass diffuser. This is a device that increases the surface area of the CO2 gas by reducing the size of the bubbles substantially. This is a proven method and can be very effective in allowing all of your CO2 gas to be dissolved. In the image to the left is version of this type of diffuser made by Aqua Design Amano Nature Aquarium Goods, the company led by  the legendary aquatic artist Takashi Amano. The gas is fed into the tube at the rear, brought down to the bottom and forced against the glass diffusser plate (the black line running in the middle). This plate has thousands of pores which the gas passes through, and once it has done this, the bubbles released through the top of the unit are extremely tiny. This all glass unit is probably the very best of its kind, and also very expensive since it is handmade in Japan. Other manufacturers make similar products. The only drawback of this method is that the plate, usually made of sintered glass, can clog and may need regular maintenance. Other than that singular drawback, this is a proven method of diffusion. The drawbacks of both versions is that their mechanical sophistication do not allow themselves to be easily homemade, and commercially produced products would have to be purchased. There are many commercially available choices, in a wide range of prices, so finding one that works in your budget would not be to difficult, if you decided on going this route.
The best method, in my opinion, is the use of a forced reactor. A forced reactor is one that can  a large quantity of water to the gas. The previous methods are passive in this respect. In other words if circulation of the surrounding water is poor, then the diffusion may slow down due to super-staturation of the water immediatly around the diffuser. By forcing mass quantities of water to meet the gas, via a pump, and mixing it thouroughy the gas is forced into the water more quickly, and then circulated. In general a forced reactor is comprised simply of a water pump and a reaction chamber. Within the reaction chamber there is some course media to help churn up the gas and water, and increase contact time, as well as preventing bubbles of gas from escaping. This simplicity of design also lends itself very well to the DIY concept. The image to the right shows one example of a DIY Forced Reactor. It is simply comprised of a powerhead with prefilter, and gravel cleaning tube, a course filter pad, and an airstone. The cost to build this, if you where to buy all the parts, is inder $35US. More details on this reactor, and other construction projects, will be given at the end of this article.
Additional Concepts and Designs
Since we are dealing with solids, liquids and gasses under pressure, it may also be a good idea to incorporate some features into a DIY system that improves both the reliability and saftey. Emergency pressure release valves and anti-clogging devices can be designed, built and utilized in that end. The construction section of this article details some additional concepts and designs in these areas.
More than you need to know about yeast.
Yeastie the Beastie!
Yeast is the primary ingredient in our DIY CO2 generators. Common baker yeasts are adequate for the needs of CO2 generators. But of course, I have to delve into the esoteric side of things. Yeast is a living organism and optimal living conditions give it the best opportunity to do what we need it to do, I had to touch upon this in this text. Also knowing there are as many strains of yeast as there are different algae, I have to touch on that also. It is also good to understand the biological processes involved here, and I will discuss this firstly.
Theodor Schwann (1810-1882) named the yeast cells "Zuckerpilz" ("sugar fungus"), which later became Saccharomyces, the genus that most yeast belongs to. Yeasts, that belong to the kingdom Fungi, are classified as belonging to either of two major types: budding yeasts, named so because of the buds formed at the cell divisions, and fission yeasts that are rod-shaped and grow by elongation at their ends. Most yeast used is of the budding type. Although easily grown in culture media, each S. cerevisiae cell (the most common species for our purposes here) has a limited number of buddings of around 20. However, in a given culture only about half of the cells will have given rise to new cells, and only rarely does a cell give rise to as much as 20 new cells. Poisoning, mutations and heat are other factors that affect the viability of yeasts. Towards the end of fermentation many yeasts aggregate into clumps, a phenomenon known as flocculation. The process of flocculation is not completely understood, but it is believed to be mediated by bivalent ions such magnesium, calcium or manganese ions.
Yeasts are probably the most researched organisms in microbiology. Entire scientific communities and disciplines have evolved surrounding this simple, single-cell fungi. If you want to blow your mind out one day, check out this link below. It is a list of researchers, their associated laboratories, and their research papers on the singular species Saccharomyces cerevisiae. This yeast has the distinction of not only being the one we generally use for our CO2 generators, but also being the first organism to have its entire genome (DNA) completely mapped in 1996.
Yeast Labs and Research
This is only for the brave of heart! Good luck! A more pragmatic description of the biology of yeast is given below.
BIOLOGY
YEAST: A living organism formed of only one cell. Each cell, which is a living being, of a spherical or ovoid form, is nothing but a tiny and simplified fungus the size of which does not exceed 6 to 8 thousandth of millimeter.
Yeast, like any living organism, lives thanks to the presence of oxygen (aerobiosis); but it also has the remarkable ability of being adaptable to an environment deprived of air (anaerobiosis).
To cope with its expenditure of energy, it can use different carbon substrates, mainly sugars:
- Glucose is the best favored food of Saccharomyces cerevisiae;
- Saccharose is immediately transformed into glucose and fructose by an enzyme which yeast has released;
- Maltose is the main endogenous substrate of French bread fermentation; it gets into the yeast cell thanks to a specific permease to be split afterwards into two molecules of glucose by maltase.
Many other sugars are also utilized.
An interesting scientific work by Vern J. Elliot shows the utilization of sugars by yeast, and yields some insight into this question. If you look at the chart below you will see growth rates of yeast over time when fed by different sugars.
Just to understand the chart, the reference of the test is as follows, (for you technically oriented folks out there) "... Plates (growth samples) were incubated at 28ºC and growth was determined at time zero and at approximately 24-h intervals by measuring absorbance at 630 nm with a microplate reader (Model ELx800UV, Bio-Tek Instruments, Winooski, VT)...".

While this experiment tested some 250 different strains of yeast, and the chart above shows the strain labeled "isolate 59", a brief examination of the published paper shows that nearly all the strains showed similar results in terms of sucrose providing the highest growth rates. It can be reasoned that the yeast strains we use in our CO2 systems would have similar results.
So what does this mean. Essentially, using less yeast and more cane sugar (sucrose), and allowing the yeast to grow and multiply will assure a longer lasting CO2 mixture. Conversly, CO2 quantity measured over time is another issue more related to use of specific mutant strains of yeast than type of sugar. Longevity of the yeast culture, due to toxic death, is also not related to type of sugar, but to alcohol levels. Acids play a much lesser role in this respect than popular belief, by the way. (More on this later). So, use of sucrose seems to be a better choice, other factors not withstanding, than other sugars.
The conditions of oxygenation of the environment generate two types of metabolism:
- In AEROBIOSIS
When yeast is in presence of air, it produces, from sugar and oxygen, carbon dioxide, water and a great amount of energy. It is the metabolic process of respiration. In these conditions the oxidation of glucose is complete:
Glucose + Oxygen —> Carbon dioxide + Water + Energy
All the biochemical energy potentially contained in glucose is freed. Thanks to this energy, yeast ensures its life. But it can also use it to synthesize organically, that is to say start its growth and multiply. It will then have to find other nutritive elements in its environment, mainly nitrogen.
- In ANAEROBIOSIS
When there is no oxygen available, yeast can nevertheless use sugars to produce the energy it needs to be maintained in life. Pasteur defined this metabolic process as being the fermentation process. Sugars are transformed into carbon dioxide and alcohol. The glucose oxidation is incomplete:
Glucose —> Carbon dioxide + Alcohol + Energy
The alcohol, which has been formed, still contains a great amount of energy. This constitutes only a part of the biochemical energy potentially present in glucose that was freed (about 20 times less than for respiration). It ensures a minimum level but does not enable yeast to multiply rapidly.
ANAEROBIOSIS is the process we use in our CO2 generators, although AEROBIOSIS would be preferred. Aerobiosis is preferred because it produces less alcohol, which is toxic to yeast at elevated relative level. But aerobiosis is also impractical for reasons you will see later.
"God is Good" is the name which yeast was given in the early days of fermentation. This is prior to the time when Louis Pasteur, in the mid 1800's, discovered that, in fact there was actually a single cell microscopic organism responsible for the conversion of fermentable barley malt sugars into alcohol, carbon dioxide, and flavor compounds.
As described by Gay-Lussac at the beginning of the nineteenth century, the chemical reaction of fermentation is as follows;
C6H12O6 + Saccharomyces cerevisiae = 2C2H5OH + 2CO2
(Sugar plus yeast yields alcohol and carbon dioxide)
The tail end of the formula is the thing we're looking for … CO2!!!
Beverages including wine, fermented milk products, and mead from honey are some examples of what developed from spontaneous fermentation, which is now understood and managed in a scientific manner. Many of these organisms were discovered more by chance, than by design. Other types of yeast and bacteria are also utilized in various styles of beer and brewing beer like beverages.
The following is a description of the many strains of yeast that are available for CO2 generation. Some are commonly available and inexpensive; some are harder to get and more expensive. The advantages and disadvantages of each type are explained.
Bakers Yeast
Bakers yeast (or Dutch Process yeast) is widely available at nearly every supermarket. It is dried active yeast. I like the term "mummy yeast" because it does seem to "rise" from the dead. Ouch! Bad pun, I know! Most of us know bakers yeast, popularized by companies like Fleishmann's. They manufacture little packets or you can buy 4oz. jars. It comes in several variations. Regular bakers yeast in 7-gram packets is by far the most common. Lately a new form known as "Bread Machine" yeast has appeared. This yeast is more tolerant of higher temperatures found when using these new automated bread machine thingies. Both work well in our application. The bread machine yeasts are available in 4 oz jars, which are more economical. Here are some detailed specifics on these types of yeast:
The following information is typical for each type of bakers yeast, but may vary somewhat according to product and company:
Compressed Yeast (also called cake, wet, and fresh yeast)
Fleischmann's compressed yeast is available in supermarkets in 0.6 oz cakes, and Red Star compressed yeast is available in some supermarkets in 2 oz. cakes. It is found in the dairy or deli case. Compressed yeast is available to commercial bakers from a variety of companies in 1 and 2 pound packets. Compressed yeast has approximately 30% solids and 70% moisture content. It is highly perishable and must be stored at a uniformly low temperature (about 40º F) to prevent excessive loss of activity or gassing. Compressed yeast generally has a shelf life of approximately two weeks from its make or packaging date when kept at 73.3º F. (23ºC)
At 32º-42º F. (0º - 5.5º C) compressed yeast loses approximately 10% of its gassing power over a 4-week period. At 45º F (7.2º C) yeast will lose 3-4% of its activity per week. At 95º F (35º C), one half of the gassing power is lost in 3-4 days. Once yeast starts to deteriorate or lose its fermentative activity, it does so quickly, losing almost all of its activity (autolysis) by the third week. It has, however, been shown that compressed yeast can be successfully stored for two months at 30º F. (-1º C). When this is done, good CO2 production can be made from yeast stored for two, but not three, months.
To use compressed yeast, soften it in tepid water.
Active Dry Yeast
Fleischmann, Red Star, and SAF active dry yeast are available in supermarkets in ¼ oz (7 g) packets and/or 4 oz (113.4 g) jars. Active dry yeast is available to commercial bakers from a variety of companies in 1 and 2 pound, and 500 g packets. It also is available in these sizes to consumers at warehouse or club stores, and via mail order. Active dry yeast has approximately 92.0% solids and 8.0% moisture content. It is advisable to store active dry yeast in a cool, dry place that does not exceed 80ºF.
The shelf life of "active dry yeast" stored at room temperature is approximately 2 years from its make date. Once opened, active dry yeast is best stored in an airtight container in the back of the refrigerator, where it will retain its activity for approximately 4 months. To rehydrate active dry yeast, blend one-part yeast with four parts lukewarm water, wait 10 minutes, and stir. Depending upon the particular product and company, lukewarm water ranges from 90º-115º F. Temperatures lower than 90º F and higher than 115º F should be strictly avoided.
Instant Active Dry Yeast
Fleischmann, Red Star, and SAF instant active dry yeast is available in supermarkets in ¼ oz (7 g) packets and/or 4 oz (113.4 g) jars. The Fleischmann product is marketed as RapidRise, the Red Star product is marketed as QUICK.RISE, and the SAF product is marketed as Gourmet Perfect Rise. Fleischmann also markets an instant active dry yeast named Bread Machine Yeast. Instant active dry yeast is available to commercial bakers in 1 and 2 pound, and 500 g packets. It also is available in these sizes to consumers at warehouse or club stores, and via mail order. Instant active dry yeast has 96.0% solids and 4.0% moisture content. It is advisable to store instant active dry yeast in a cool, dry place that does not exceed 80º F.
The shelf life of instant yeast stored at room temperature is approximately 2 years from its make date. Once opened, instant active dry yeast can be stored in an airtight container in the back of the refrigerator, where it will retain its activity for approximately 4 months. To rehydrate instant active dry yeast, blend one-part yeast with five parts lukewarm water, wait 10 minutes, and stir.
It is worth noting that there is disagreement among the yeast companies as to whether or not active dry and instant active dry yeast should be frozen, and if in doing so the shelf life of the yeast is prolonged. The most convincing argument against freezing is that under normal conditions, there are temperature fluctuations in freezer units caused both by repeated opening and closing of the freezer door and, in contemporary freezer models, by the self-defrosting (freeze and thaw) cycle. These temperature fluctuations can cause damage to the yeast cell structure.
One topic upon which there is agreement is that if active dry or instant active dry yeast has been refrigerated, and is going to be rehydrated in lukewarm water, it is best to allow the portion of yeast to be used to come to room temperature prior to blending it with the lukewarm water. Otherwise, temperature shock might damage the yeast cells.
Unlike compressed yeast, which disperses in cold water without any problems, the temperature of the water during rehydration is important when working with dry yeast. When yeast is dried, the cell membrane becomes more porous. During rehydration, the membrane recovers. However, in the process of rehydration, some cell constituents are dissolved in the water used. The optimum water temperature for cell membrane restoration is 104º F. Warm water is effective in this process, because it leads to more rapid cell membrane recovery. Cold water impedes this process, because it slows membrane recovery and allows more cell constituents to leach out during the reconstitution process. The effect is not that great between 70º and 100º F, but at lower temperatures approximately one-quarter to one-half of soluble yeast cell constituents can be lost. This leaching action effects yeast activity in the following manner: Most yeast enzymes remain, but the soluble chemicals are depleted, and it is these chemicals that promote enzyme activity.
Brewing Yeast
These are specific strains of yeast that are used in the brewing of beer. There is a wide variety of brewers yeasts bred specifically for different types of beer, and is what makes most brands taste different by the way. It's not the "…clear mountain water" or "…the loving hands of the brew master". It's the bugs they put in it! Use a different bug; get a different tasting lager or ale. Saccharomyces cerevisiae, and Saccharomyces uvarum are the genus and species of ale, and lager yeast respectively. These are the primary types of yeast cultures, which produce most of the world's beers. The Ale yeast is a specialized strain of S. cerevisiae, which adapts better to higher alcohol levels.
Most of these are live cultures in liquid form, and do not require the rehydration process used with dry yeasts.
Wine or Champagne Yeast
These are very specialized yeast strains that do different things, like soften the wine's acidity or absorb tannins lightly. This is accomplished by the release of enzymes specific to this strain of S. cerevisiae. In addition, they also can ferment at a wide range of temperatures and can tolerate the highest alcohol and acid levels, which is toxic to most yeast. This is an important point for our application.
Another benefit side effect is that this yeast has a tendency of settling towards the bottom of a culture, or it is said to be a bottom flocculent. Bakers and Ale yeasts are top flocculants, which is that gooey, tan head on the top the sugar water you see when using bakers yeast. Champagne yeasts usually do not have this build up of yeast at the surface. Therefore they can help reduce a common problem with DIY CO2 systems, the clogging of the airlines, and raw yeast getting pumped into the tank.
Some of the best yeasts, discovered in my testing for our application, are sold under the brand names "Pasteur Champagne" and "Eau de Vie", from Wyeast Labs, Inc. in Mt. Hood, Oregon.
Again, as with brewers yeast, most of these are sold as live cultures in liquid form, and do not require the rehydration process used with dry yeasts.
What are the advantages of the more esoteric yeast for DIY CO2?
Right off, I will say that you can certainly use the common bakers yeast with great success. It is more than adequate. But there are certain factors where you may want to optimize the performance of your system.
One downright frustrating thing about DIY CO2 is the maintenance and replenishment of the mixture. You have to change your mixture every 7-14 days, depending on how well your particular formula works. Fourteen days seems to be the limit for most yeast mixtures in a two-liter bottle when using bakers yeast. This is due to the fact that the alcohol levels reach a point where it kills the yeast cells, even if it hasn't used up all the sugar. The general consensus has been that it is the rise in acid levels that kills off the yeast. But this is probably not true. One way that has been proposed is to add baking powder as a buffer to the mixture to regulate the acids, but this does little to effect the alcohol levels. Oddly it is not the acids that are problematic. Yeast can generally deal with acidic levels to a point, as you will see below.
Yeast Tolerance to Acidity
Yeast exhibits a considerable tolerance to extremes of pH, being able to maintain an active fermentation in a 5% glucose solution in the pH range of 2.4 to 7.4, but ceasing activity at pH 2.0 or pH 8.0. For optimum results, good practice dictates that the pH of the fermenting medium be maintained within the range of about 4.0 to 6. A drop of more than 50% in fermentative activity has been observed at pH 3.5. More gradual declines in yeast activity were encountered at higher pH levels, with measurable effects showing up at pH values over 6.0.
The explanation for the yeast's ability to maintain a relatively constant activity over a 100-fold change in hydrogen ion concentration (pH 4 to 6) is found in the fact that the pH of the cell interior of the yeast remains quite constant at about pH 5.8, regardless of any relatively wide pH variations in the fermenting medium. The enzymes involved in fermentation thus operate in an optimum pH environment within the yeast cell that is largely unaffected by external changes in pH.
Conversely, sodium ions are also toxic to yeast, so once the sodium biphosphate has been broken down by the acids, the free sodium ions tend to kill off more yeast cells. So this method is only a transparent fix to the yeast kill-off. The logical alternative is to find strains of yeast more resistant to high alcohol levels, since alcohol appears to be the true killer. The apparent regulation by buffering with baking powder is probably due to the issue of sodium slowing the reproduction process, thereby slowing the consumption of sugar by limiting the population of living yeast cells. While this extend the life of the mixture, it also reduces the CO2 output over the lifespan of the mixture. This is a result of reduced, or at least controlled, yeast cell population.
Brewers yeast is one step in the right direction. Strains of Saccharomyces cerevisiae brewers yeast, commonly referred as Ale Yeast, is a good choice for this. It is more tolerant to higher alcohol levels and should provide a longer lasting mixture; usually by about 4-6 days longer than the bakers yeast strain. It is also seems to be more tolerant of sodium. Using Ale Yeast in your mixture can yield a longer lasting mixture.
Champagne Yeast is tolerant of the highest alcohol levels, and wider temperature ranges. Another side effect is that its metabolism seems to be in hyper-speed, producing nearly twice as much CO2 as other strains. It also ferments well at average room temperatures. This makes it the perfect yeast strain (and the most expensive) for our applications. I have had mixtures with this strain, very carefully prepared aseptically, last strongly for nearly 24 days.
Now for the downside. Costs are very high with these esoteric yeasts. The cost is nearly 3-5 times more expensive as common bakers yeast. Also, these yeasts work better if inoculated into your sugar water when they are alive, which is the form they are purchased in. This makes storing them difficult. The manufacturers makes these available to home vintner's, and are prepared in much larger quantities than we would use. Anything left over last only for a very short period, and is difficult to store and keep viable.
Finally, it should be noted that there is also an inverse relation between the amount of yeast and fermentation time. Thus, a reduction in the amount of yeast will result in longer fermentation times, while an increase in the amount of yeast will shorten them. We'll talk about this more in the section on mixtures.
Yeast is hardy, yeast is intolerant.
Now that's an oxymoron if I ever saw one. But that's the nature of the yeast. It can withstand drying, pounding, skimming, centrifugal forces, replicates itself easily; yet in the wrong situation it will crash faster than a CO2 injected tank with a 1dkH when the mixture runs out. Opps…got ahead of myself there.
One of the most important issues to remember when using yeast in fermentation is cleanliness. Yeast does not compete well against bacteria, so it is important to keep things as close to sterile as possible. One excellent and simple way to deal with this is as follows.
Note of Caution: Be very careful with this, since very bad burns can be had here.
Thoroughly rinse out your two-liter bottle with hot water; use no soap or detergent. Keep an extra bottle cap handy. Boil the water you plan to use, and place this extra cap in the water to sterilize it. Pour the boiling water (use a funnel) into your two-liter bottle. While it is still ripping hot, add your sugar, and use the cap you boiled clean, and cap the bottle tightly. Shake well until most of the sugar dissolves. This sterilizes the bottle, water, and the sugar. This is what they call an aseptic preparation. Do not uncap this until you let the water cool to room temperature and are ready to add the yeast.
If you plan to use dry yeast you should activate the culture first. As discussed previously, yeast needs to start in an aerobic environment first, so it can then readily adapt to the anaerobic conditions in our little fermentation factory. Many folks who omit this step believe they are creating this situation with just the action of pouring the mixture into their bottle. But they also do not realize that much of the yeast they use dies, because many of the yeast cells could not complete the aerobic phase of its life before the conditions change to anaerobic. This step insures all the yeast is already aerobically active and working before it is placed in the generator. The time it takes for the generator to begin producing pressurized CO2 is significantly reduced by this following step. These yeasts also need to be rehydrated properly, as also previously mentioned, so as to not damage the yeast cell walls.
I take my measure of yeast, add a small quantity of tepid water, 100º-115ºF, (not hot), and stir it up in a little cup with a fork. Stir the mixture until the yeast in no longer in clumps, but instead a smooth creamy tan liquid. Now here's the part everyone forgets, add a few pinches of sugar and vigorously mix the yeast liquid up making lots of bubbles. You want to get oxygen in there to get the yeast going. Once this is done, let the mixture stand for about ten minutes. Then take your funnel in hand, open the aseptic bottle you prepared, and pour in your yeast culture.
Now granted this isn't a perfectly sterile method, but by reducing the chances of bacteria getting in on the outset, the yeast mixture will prevail quicker and last that much longer.
More information about specific mixtures, formulas, and capacities of systems will be given in the next section of this article.
Authors Final Notes on Yeast
In preparing this article, I have conducted research into yeast and dove head first into the scientific data available from researchers. To date I have not been able find data on any specific strain mutated for its ability to produce CO2 gas exclusively, while it appears there has been some strains developed. Generally, mutant strains of yeast are selectively bred for controlled production of by-products like alcohol and carbon dioxide. Can yeasts be improved for our purposes? Most likely work will continue on this process for as long as there are chemists, and geneticists interested in yeasts. One of the more interesting new research areas in this domain is the work on recombinant-DNA technology as it pertains to the development of newer yeast strains. This work has led to changes in formulation, ingredients and processing conditions. Some of this work has led to new strains of yeast that are more resistant to stress, produce more proteins, and more carbon dioxide.
Some discussion exists on the genes in the HTX group and the role they play in the cell utilizing glucose in various stages of it life. In the yeast Saccharomyces cerevisiae, the Snf1/AMP-activated protein kinese family is particularly important for the response to glucose deprivation, and this kinase regulates genomic transcription, metabolic activity, and developmental processes such as invasive growth. These genetic research results show, in effect, the potential for a mutant strain that is longer lasting since it could be designed to utilize less glucose, or require less glucose to produce CO2 in useful quantities for our purposes here. If there is any other specific scientific data on this, I would be interested in seeing it.
Guidelines for Mixtures and Capacities
It is important to understand that the yeast/sugar/water mixture is not a precise science. You will have to experiment to find what works best for your situation. I will give some suggestions in this section on formula's based upon the scientific data presented above and my own personal experience.
Mixture Formulas
For two-liter bottles:
- 2 cups water
- 2 cups Sucrose (cane sugar)
- ¼ teaspoon Fleischmann's Active Dry Yeast
- ¼ cup tepid (ideally 104ºF) water
The yeast should rehydrated first in the tepid water. The aseptic method mentioned previously should be used.
This is the easiest formula, using the most widely available ingredients. This mixture can last up to approximately 16 days, if the aseptic method is used.
An improved formula is:
This is a more costly mixture. Since this yeast is a liquid live yeast, (refered to as pitchable) it does not need to be rehydrated. This yeast is more tolerant to higher alcohol levels, therefore this mixture can last up to approximately 22 days. It also has a more consistant output of gas over time.
Tips on Mixtures
You should experiment on your mixtures. Everybody has different water, with its own unique chemistry. And this influences the performance of your mixture. So try slight modifications of the yeast/sugar/water ratios till you find what lasts the longest for your situation.
There is evidence that yeast mixtures last longer if you decrease the amount of yeast, and conversely last shorter periods if more yeast is used. Lower yeast also means less CO2 produced per minute, but produce more consistantly over time. Higher yeast levels will cause an initial higher burst of CO2 production with a gradually declining production over time. Keep this in mind while experimenting.
There also has been some discussion on adding other nutrients to the mixture to help the yeast grow and multiply. This is an area I have not researched directly, but may be of interest. Nitrogen seems to be a nutrient that yeast utilizes. Unfortunately the research I have gleened showed that nitrogen is used by yeast only when it is in an aerobic environment, not the anaerobic environment we are putting it in. I have not seen any direct research that showed any nutrient other than sugars are used by yeast in anaerobiosis.
Speaking of aerobiosis, as shown before this reaction only produces CO2 and water as by-products. Alchohol is not produced. So why not just produce an aerobic environment? This would involve injecting oxygen (O2) into the mixture chamber. Now one could aerate the mixture to do this, but of course this would be sent out into the system that is supposed to dissolve only CO2 gas. The problem is obviously a matter of either injecting an air mixture with elevated CO2 levels into your tank, or choosing a pure CO2 gas to be dissolved. The latter is what is prefered, and in fact essential for a CO2 system to work from a practical concern. So unfortunately we still will have to deal with alcohol as a by-product, and deal with it accordingly.
System Capacities
A good CO2 system will provide enough gas to supply a given amount of water to reach the idealized level of 15ppm of dissolved CO2. As a rule of thumb, each two-liter bottle will provide enough gas for up to 30 gallons of tank water, assuming you use an efficient method of mixing the gas and tank water.
It is important to remember when using CO2 injection in a freshwater planted aquarium that doing so reduces the pH in the water. Some of the CO2 dissociates and forms Carbonic Acid. This results in a lowering of pH due to the addition, or more accurately put, the creation of acids in the tank water. To prevent wide fluctuations in pH over the life of your mixtures it is important to make sure the buffering capacity of your tank is high enough. This is determined by measuring the carbonate hardness of your tank water. This is refered to as your waters kH. A good kH for most planted tanks is around 6dkH. This will ensure your pH doesn't swing to abruptly over the life span of your mixture.
Interestingly, you can use this relationship of carbonate hardness and pH to determine you CO2 level in your tank. If you have fresh and accurate test kits, one for pH and another for kH, you can use the chart below to determine your CO2 levels

Chart derived by George Booth, rendered by Jeff Dietsch
Construction Projects
Okay, here's the fun part. Actually making a DIY CO2 System of your own. On average, a DIY CO2 system for a 55 gallon tank, like the one depicted at the beginning of this article, would cost about $50 to make, complete! And that includes the soda. Remember, that's probably about a quarter of the price of a complete pressurized system with a diffuser of some kind. While the pressurized system is the best way to accomplish CO2 injection, the DIY method will provide very excellent performance, costs substancially less money, and can be even fun to build if you're handy. There is nothing like the pride and satifaction of knowing that you "Did It Yourself"!
The Perfect Two-Liter Bottle Generator
 While using a two-liter soda bottle for a generator is not a new idea, one of the downfalls of most attempts has been in connecting the tubing to the bottle cap. Most caps are manufactured from a material known as polyethylene. It is used because it wears well, is resistant to bacterial growth, and is resistant to acids. It also has a excellent ability to deal with pressure. In addition to being a good candidate for a soda bottle cap, these same charecteristics make it ideal for our application. But unfortunately, polyethylene is also difficult to bond with most adhesives.
 Most instructions for using soda bottles for generators advise drilling a small hole, and gluing the airline in place. This has been the weak link in most DIY generators. The poor bonding capabilities of the cap always lead to seal failure, and consequent leaks. An improved way of dealing with this would be to have some type of mechanical seal, and a bulkhead type fitting for the tubing to connect to. This would be better engineering practice. To the left is a diagram showing the completed two-liter bottle generator with the bulkhead fitting in place.
One of my other hobbies is RC airplanes, specifically jets! This little device is a nylon bulkhead fitting for engine fuel. It is designed for use with silicon tubing just like the type we use with CO2 systems. It screws in tightly into the hole in the two-liter bottle cap, makes an airtight mechanical seal, and makes removing the tubing from the bottle a breeze when you change your mixture.

Here is a link to a place where you can purchase this online:
Tower Hobbies
It's manufactured by Fourmost Products, Oregon, and sells for around $3.75US. If you have a very good hobby shop nearby, you may be able to get it there. You get two fittings in the package. I love these things; they made doing mixture changes and worn cap replacement a breeze!
Over Tolerance Pressure Release and Prevention Systems
In yeast generator systems a common frustration is clogging of the air lines due to flocculated yeast. Sometimes yeast will get trapped in the air lines and pressure can build up to the point where you have an explosive situation. It is not uncommon for the cap to blow off, one of the airlines blowing off, or even one of the generator bottles failing. When this occurs, the usual result is smelly, sticky yeast solution gets blow great distances around your home. Yuck!
One solution is a simple Pressure Release System. Essentially, all this is some form of plug that will blow off when a certain amount of over pressure is developed in the system. One type of this release valve is shown in the image to the right. This is comprised of a nylon airline tee,
 and some soft plastic or rubber cap. The part of the tee for the cap must have its barb carefully sanded off with emery cloth until it is smooth. It must be sanded down in such a way where the cap fits on snugly so as to not leak, but also pop off if the pressure builds up high enough. This has to be done thru careful trial and error. I take a bottle of seltzer, put the special cap on it for the generator and fit the tee on with the cap and the other side of the tube blocked or plugged. I then shake the seltzer bottle till some pressure builds and up and observe the point at which the cap blows off. It takes some time and patience to make one these work right. If you sand down too much and the cap is not snug enough it will blow to early, so you have to then start over with a new tee and test again. The whole process of making one of these do-hickey's is a little bit tweaky, so if do not have the patience to sit down and carefully craft one these I would recommend not doing it. It will, if not made properly, work when you don't want it to and cause more trouble. This unit should be placed between what runs into the tank and a Gas Separator. Which lead me to the following ...
 Another means by which you can eliminate or reduce yeast build up in the airlines is by using a Mechanical Gas Separator. Basically, this is a bottle with an input and output fitting. The idea is to use this vessel to separate the gas from solids and liquids using gravity. This therefore prevents solids from making their way up the tubing and clogging at some point. The image below this paragraph depicts an example of a separator made from (you got it) a 16oz. soda bottle. It is attached with nylon tie-wraps to the side of a two-liter yeast generator bottle. Once again our special bulkhead fittings are used, only this time two are placed on the cap. Inside the bottle, a length of rigid air line tubing is placed onto the inside of one of fittings. This is the the input of the separator. The other fitting remains unmodified. This is the output of the separator. The concept works like this; gas, liquids and solids come from the yeast generator and enter the separator through the input and into the bottle thru the rigid tubing. Any liquids and solids will fall, due to gravity, to the bottom of the separator bottle. The gas, not being effected by gravity but instead from gas pressure, continues on through the output fitting and out to your tank. The rigid tubing serves to provide a larger distance between the input and output to reduce the chance of blow by of the liquids and solids, if the pressure release valve blows. This also prevents solid material, like flocculated yeast cells, from clogging your airlines during normal operation. For best effectivenes, the separator should be placed as physically close to the yeast generators as possible.
 Using any or both of these saftey systems insures improved performance and reliability of your overall system. These two simple designs, if made properly, will provide assurance that the most common problems in DIY systems, tube clogging and high pressure explosive failures, are substancially reduced, if not eliminated completely. Try them!
DIY Powered CO2 Forced Reactor
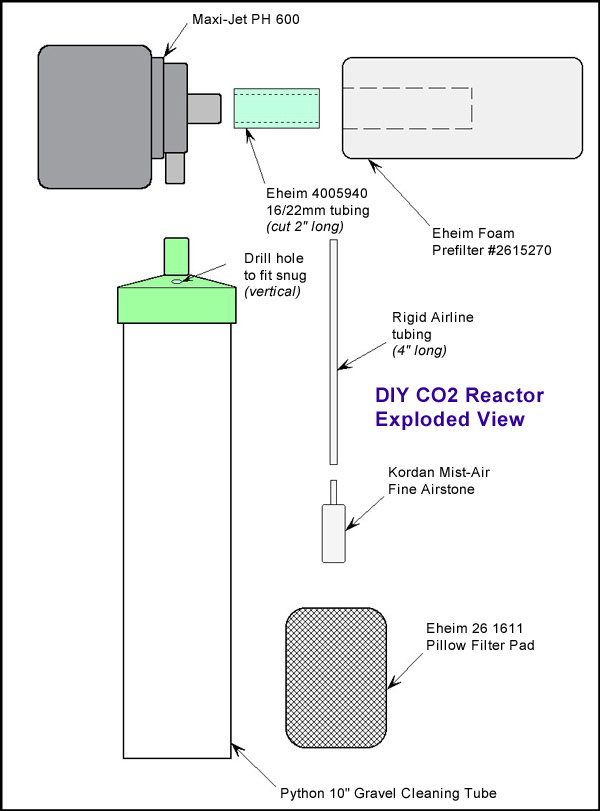
This section describes a DIY powered CO2 reactor made from parts widely available at nearly all LFS (local fish store) and online dealers. No special tools are required since all components push together, with the single exception of a drill bit. The cost of the entire device is under $35US complete and has a total count of 8 parts inclusively. The unit also doubles as a mechanical/biological sponge filter system, and could be the sole filtration for tanks up to 30 gallons in volume.
The image to the right shows a drawing of the completed unit. The unit will work with DIY yeast systems, or the more complex pressurized CO2 systems commercially available. The primary purpose of this reactor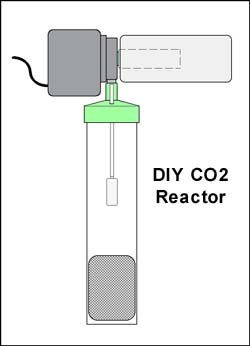 is to allow CO² to be thoroughly dissolved into the tank water. This is accomplished by injecting the CO² into the reactor, and keeping it contained in a chamber with a high flow rate of water. This is an active system, which means it brings water under pressure to the CO² instead of simply allowing the CO2 to passively meet standing water, as in a diffusor with scintered glass or a bell. It also is much less prone to clogging like the aforementioned diffusor. The system prevents CO2 bubbles from escaping the tank before being dissolved; meaning nearly all the CO2 you inject gets dissolved.
By having a large foam pad over the inlet for the powerhead, instead of the usual inlet basket, the unit doubles as a foam filter. This also prevent clogging of the pump impeller and keeps the mesh pillow at the bottom of the reactor chamber clear from debris. If debris was allowed to collect on this pillow, flow would be impeded and the CO2 would have a difficult time getting into the reactor due to back pressure in the chamber. A check valve on the CO² line is therefore a requirement. I have determined that this foam filter would be sufficient to supply all the filtering needs in a heavily planted tank, with a moderate fish load, of up to 30 gallons. No other filtration would necessarily be needed.
The pump is a standard powerhead, a Maxi-Jet PH 600 manufactured by Aquarium Systems. This unit sells on the web for about $14 and is used to pump water into the reactor chamber and as the filter. 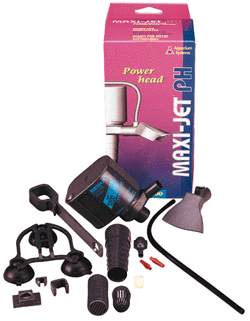 It delivers a flow rate of about 160gph, which in theory would pump the water of a 55 gallon tank twice every hour through the reactor chamber. Most of the Maxi-Jet's supplied accessories are unused except the suction cups used to attach it to the tank wall. The pump itself will be used unmodified for this application. The Maxi-Jet 600 PH pump and power head includes an innovative triple-suction cup mount which is sufficient to hold the entire reactor in place inside your tank. It is a fully submersible powerhead and the only items that need to be fed out of the tank will be the AC power cord for the powerhead, and the CO2 supply line.
The design of this powerhead is of a very simple three piece construction. A simple twist of the inlet/outlet flange, and the impeller simply pulls out for cleaning or replacement, if necessary. The unit also has, as an option, a basket and foam filter which could be used instead of the foam filter I will recommend shortly. This foam prefilter is not as large, nor will it supply the amount of filtration as the foam filter used in this reactor design. It could however be used on tanks that already have a pre-existing filtration system. Either way, a foam filter of some kind should be used to prevent the powerhead, or especially the chamber pillow, from clogging with debris. Since the foam filter is on the top of the unit, it makes it easier to remove, rinse, and reattach. If the chamber pillow gets clogged, because a prefilter is not used, the entire reactor would have to be removed to gain access to the pillow, which is located at the bottom of the reactor chamber. In short, make sure you use some kind of pre-filter on this reactor.
The foam filter used in this design is an Eheim prefilter that was supplied with my Eheim 2227 wet/dry filtration system. The Eheim part number is 2615270. It is a cylindrical foam filter that fit snuggly over 1/2" tubing. I cut a piece of tubing (again supplied with my Eheim filter) approximately 2" in length. This slips snugly over the inlet pipe of the Maxi-jet powerhead. The foam prefilter is then slid onto this tubing. That's it!
The next item is the device for the reactor chamber itself. If you haven't figured it out already, it's a gravel cleaning tube. This specific one is from the Python Products  No-Spill water changer system. These tubes cost about $10US. This particular one is the 10" version. The tube is a clear plastic and the flange at the top is a softer more pliable plastic. Take this flange and remove it from the tube. On the top, halfway between the outer edge and the hole for the tubing, drill a small hole to fit the rigid tube that will be inserted for the airstone and the inlet of CO2. This can be done by twisting a drill bit between your fingers. Make sure this hole is drilled perfectly parallel to the clear plastic tube walls. The diameter of the hole will be determined by the particular rigid tubing you use. Make sure the hole is slightly smaller than the outer diameter of the tubing chosen, so as to assure a very tight fit. More on this later.
What I liked about this tube (and by the way, what gave me idea for this reactor) is the fact that the flange on top is slightly conical. This is advantageous because any bubbles that may rise to the top of the reactor chamber are forced back into the center and into the flow of water coming from the pump. The inlet at the top also fits snuggly over the outlet of the Maxi-Jet 600's outlet tube, without the use of any adapters. It is soft and pliable enough that it will not be split when pushed onto the powerhead.
Next I found that if a fine airstone is used the efficiency is increased. I chose a Kordon Mist-Air Fine airstone, item #62503, which I highly 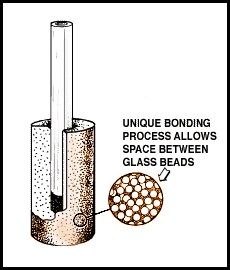 recommend in this application. One of the things I have found with airstones in general when using them with CO2, is that the acidic environment tend to make airstones disintegrate quickly. The Kordon Air-Mist stones do not exhibit this problem. Also the fine airstone produces very small CO2 bubbles. There is a medium airstone from Kordon that produces bubbles the same size in fresh water, but the added back pressure in the fine stone helps in the regulation of yeast based DIY CO2 generators. It sells for about $3US.
These stones are of a glass bead construction. If you use this airstone make sure you get a stiff plastic tube that fits over the airstem. The airstem has an outer diameter of .195" and you must have a tight fit. You probably can get ¼" rigid tubing from your LFS. You need about 4" in length. Once you get this rigid tubing, drill the hole in the Python tube flange slightly smaller so the tube fit very snugly. I recommend you start with very small drill bits and work your way up in size until you get the right, tight fit. If you do this, you won't have to resort to adhesives like silicon. In addition, do not attempt to use silicon or regular airline tubing. Once the pump is turned on, an airstone dangling from the end of a piece of soft airline will rattle around inside the reactor and make quite a racket. Go for the stiff, rigid tubing.
Next, in order to keep the CO2 bubbles from blowing out of the reactor chamber, an Eheim Filter Pillow. This particular one was used in the Eheim 2211 cannister filter as a course filter and a media separator. The Eheim item number is 26 1611 and it is available.  It is a course, stretchable, nylon webbing tube rolled-up into itself to form a pad. Take this and insert it into the bottom of the gravel tube. Any material that is like course webbing will work, this was simply convenient for me. Do not use a foam pad, unless you can see through it easily. Foam pads will clog, mostly with nitrifying bacterial growth, which will inhibit out-flow of the reactor. This may lead to excessive back pressure problems on the CO² supply, especially when yeast generators are used. So use something very course, and that fits snuggly into the reactor chamber. Otherwise, it may be blown out of the bottom of the tube. This Eheim pad works great if you can find it. I will give a list of online dealers who have it (and the other parts) in stock, as of this writing.
Lastly, it is recommended you use a check valve on the CO2 line leading to the reactor, especially if you use Yeast generators. Make sure you use plastic ones or types specifically made for use with CO2. If you don't they may fail over time due to the corrosive nature of carbon dioxide.
Below is an exploded view drawing of the Reactor. It gives you a better idea, visually, of how it all goes together.
|
| Here is a parts list and a list of online places that stock these products. Remember, many if not all of these items can probably be found at your LFS, as well. |
Conclusion Using CO2 in your planted freshwater aquarium will show dramatic improvement in the health and growth of your aquatic plants. Understanding that a yeast generated system is again another "ecosystem in a bottle", like our tanks, you can provide the much needed CO2 your plants need. By providing a heathy living and growning evironment for the little single sell creatures doing all the work, you can have a reliable source of carbon dioxide. As the famed aquarium artist Takashi Amano said, "We have to remember that we either live in nature or not at all. Through building and maintaining beautiful natural aquaria, people relearn the intricate connections between forms of life: plants, fish, microorganisms and humans. Riches and beauty come from harmony, from balance. Aquaria are great teachers of this truth." So remember this as you grow not only your fish and plants, but also those small single cell microorganisms in that two-liter bottle. I hope you enjoyed reading this article as much as I had researching and writing it! |
Take from
http://www.qsl.net/w2wdx/aquaria/diyco2.html

 The Indonesian shortfin eel, Anguilla bicolor bicolor, is a subspecies of eel in the genus Anguilla of the family Anguillidae. It is found throughout the tropical coastal regions of the Indian ocean and western Pacific.


